
Pruning
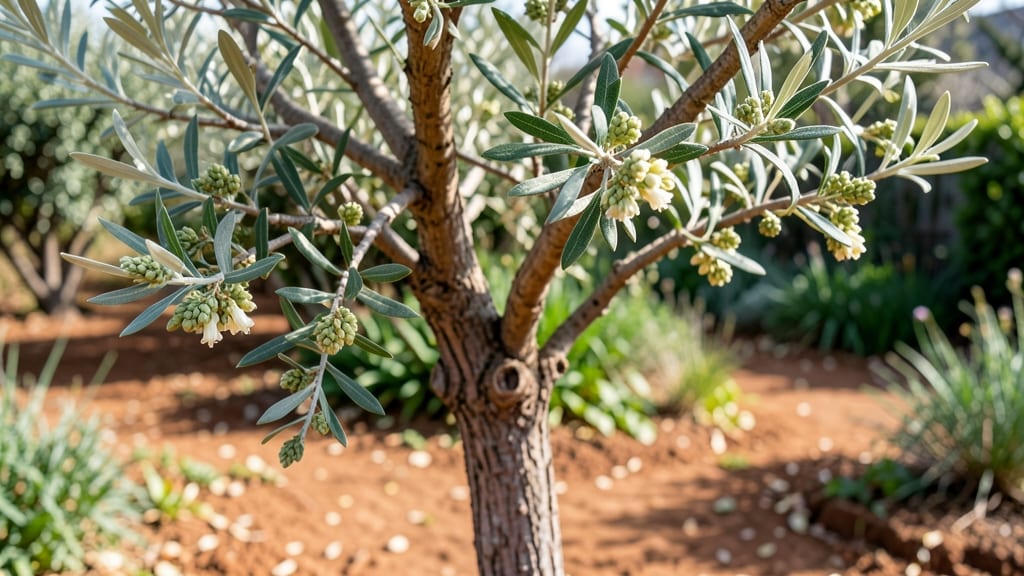
Recognizing olive tree flower buds is the first step to a harvest of silvery-green fruit—yet most gardeners mistake them for leaves. 🌿 These tiny, fuzzy clusters form along last year’s growth, and spotting them early (usually in late spring) lets you prune strategically to encourage more blooms.
The key is timing: prune too late, and you risk cutting off potential fruit; too early, and you stunt new growth.
Encouraging bud formation starts with pruning in late winter, when the tree is dormant but before buds swell. Focus on thinning branches to improve airflow—this reduces fungal pressure and lets sunlight hit the canopy.
A balanced soil pH (6.0-8.0) and consistent moisture (but never soggy roots) also make a difference. My trees in Zone 7 now produce buds every year after switching to a slow-release fertilizer in early spring.
Once buds appear, protect them from scale insects and olive fruit flies—both can devastate blooms. A neem oil spray every 2 weeks keeps pests at bay without harming bees. After flowering, hand-pollinate if your area lacks wild pollinators by gently shaking branches on calm days.
By mid-summer, you’ll see tiny olives forming, and with patience, they’ll ripen to rich, buttery perfection by fall.
This method works for container-grown trees too—just use a 5-gallon pot and prune aggressively to maintain shape. The secret? Less is more: prune only to open the canopy, and never remove more than 25% of growth in one season.
Your tree will thank you with year-round blooms and a bountiful harvest.
📚 In This Guide
- What you need
- Instructions
- Tips and common mistakes
- Wrapping up and next steps
What you need
- ● Pruning shears: Bypass pruners (sharp, clean, and 7–10 inches long) for cutting branches up to ½-inch thick.
- ● Loppers: Bypass or anvil type (for branches ½–2 inches thick). Look for long handles (20+ inches) for leverage.
- ● Pruning saw: Curved-tooth saw for branches 2+ inches thick (avoid pinching cuts!).
- ● Disinfectant: 70% isopropyl alcohol or rubbing alcohol to sterilize tools between cuts (prevents disease).
- ● Gloves: Heavy-duty gardening gloves (cut-resistant if needed) to protect hands from thorns and sap.
- ○ Pruning sealant: Optional but helpful for large cuts (>1 inch) to prevent sap loss (use tree wound paint or pruning wax).
- ● Bucket or bag: For collecting pruned branches (5-gallon bucket or compostable pruning bag).
- ● Ladder or step stool: Sturdy and tall enough to reach the tree’s canopy safely (check weight limit!).
- ● Best time to prune: Late winter or early spring (just before buds swell) or summer after harvest (avoid pruning in fall/winter in cold climates).
- ● Weather: Prune on a dry, overcast day (humidity slows healing). Avoid pruning if rain is forecasted within 24 hours.
- ● Olive tree age: Wait until the tree is 3–5 years old before heavy pruning (young trees need shape, not size reduction).
- ● Tree health: Avoid pruning if the tree is stressed, diseased, or recovering from transplant shock.
- ● Local regulations: Check if your area has restrictions on pruning times (some regions prohibit pruning during nesting seasons).
- ● Hand lens or magnifier: To inspect buds and cuts closely for pests or disease.
- ● Sharpener: Pruner sharpening stone to maintain blade sharpness between uses.
- ● Marking twine or flags: To label branches for future reference (e.g., "fruit-bearing" vs. "structural").
- ● Compost bin: For repurposing pruned branches (they make great mulch or firewood!).
- ● Safety gear: Safety glasses if working near your face or eyes.
Step-by-Step guide to pruning olive tree flower buds
Here's how to encourage consistent blooms and fruit production through strategic pruning.
✂️ Step 1: Time Your Pruning for Optimal Growth
Prune olive trees in late winter or early spring, just as new growth begins but before buds break. This timing ensures you remove dead wood while stimulating fresh flower buds. Avoid pruning during dormancy—you'll miss the window for next season's blooms. In warmer climates, a light pruning in late summer can encourage fall flowering, but never prune after buds form in spring.
Watch for swollen buds along branches—these are your signal that the tree is preparing to bloom. If you prune too late, you risk removing potential flower clusters. I always mark branches with white tape before cutting to track which limbs I've already shaped.
🌿 Step 2: Remove Dead, Diseased, or Crossing Branches First
Start by cutting out dead wood, branches with peeling bark, or those rubbing against others. Use clean, sharp pruners to make cuts at a 45-degree angle just outside the branch collar. Diseased branches should be bagged and disposed of immediately—olive trees are susceptible to verticillium wilt, and infected wood spreads spores.
Look for crossing branches growing toward the center of the tree. These compete for energy and often lead to weak flower production. Remove the smaller of the two branches at its base. Thin out crowded areas to improve air circulation, which reduces humidity and fungal risks.
☀️ Step 3: Shape the Tree for Light Penetration
Olive trees need full sun to produce abundant flower buds, so open the canopy by removing overlapping branches. Focus on the interior first—these shaded limbs rarely bloom. Aim to create an open vase shape with a dominant central leader. Side branches should emerge at 45-degree angles for structural strength.
Step back frequently to visualize the tree's silhouette. You're not just pruning for aesthetics—every cut should improve light exposure. If a branch is too dense, thin it by one-third to let sunlight reach the center. Avoid heavy pruning in one season; olives respond best to gradual shaping over years.
⏰ Step 4: Encourage Flower Bud Formation Through Strategic Cuts
Flower buds form on one-year-old wood, so preserve last year's growth when pruning. Make cuts just above a leaf bud or lateral branch to stimulate new growth. Avoid cutting back to old wood—this removes potential flowering sites. For mature trees, lightly head back some branches by one-third to encourage bushier growth with more bud sites.
Pay attention to water sprouts—fast-growing vertical shoots that steal energy from flower production. Remove these completely at their base. If you see weak, spindly growth, the tree may need more sunlight or balanced fertilization. I often apply a low-nitrogen fertilizer in early spring to promote flowering over leafy growth.
🪴 Step 5: Post-Pruning Care for Healthy Blooms
After pruning, water deeply to help the tree recover. Olive trees are drought-tolerant but need moisture to regenerate after cuts. Apply 2-3 inches of mulch around the base (but keep it 6 inches away from the trunk) to retain soil moisture and regulate temperature. Avoid heavy mulch piles—this can suffocate roots.
Monitor the tree for new growth in 4-6 weeks. Healthy shoots should emerge from the cut points, indicating successful pruning. If buds form along the branches, you've encouraged flowering. For container-grown olives, prune more aggressively to control size, but always leave enough foliage for photosynthesis.
Tips & tricks for perfect olive tree flower bud pruning
Mastering the art of olive tree pruning transforms a struggling plant into a fruitful powerhouse. Here's how to elevate your technique beyond the basics.
Seasonal Precision: The late winter/early spring timing in Step 1 is non-negotiable for Mediterranean climates, but adjust for your zone. In Zone 8-10, that late summer pruning can be your secret weapon for fall blooms—just finish by August to avoid frost damage. I've seen trees in California produce second harvests this way, but only when pruned before buds swell. Mark your calendar using the swollen buds as your natural alarm clock rather than fixed dates.
Tool Technique: Step 2 emphasizes clean cuts, but here's what nobody tells you: sterilize your pruners between cuts with rubbing alcohol. Olive trees are particularly vulnerable to bacterial canker through open wounds. I keep a small spray bottle in my pruning kit—just a quick spritz between branches prevents cross-contamination. For larger limbs, use a three-cut method: undercut, top cut, and final twist to avoid tearing bark, which exposes the tree to disease.
Light Architecture: The open vase shape in Step 3 isn't just about looks—it's about creating a sunlight gradient. Start your pruning at the north side of the tree (in Northern Hemisphere) where shade is most intense. Remove branches that cast shadows on others, even if they're not crossing. Think of it like designing a skylight system for your tree—every cut should funnel sunlight deeper into the canopy. For mature trees, I aim to create three-dimensional light paths rather than just horizontal thinning.
Post-Pruning Recovery: The 4-6 week growth window in Step 5 is your quality control period. After pruning, I apply a mycorrhizal fungi treatment to the root zone—this helps damaged roots recover faster by forming beneficial partnerships. For container-grown olives, reduce watering by 30% for the first two weeks post-pruning to prevent root rot from the disturbed soil. The tree will signal its needs through leaf color: dark green means it's happy; yellowing indicates stress from either too much or too little water during recovery.
Pro Tips for Olive Tree Flower Buds
- Mastering the art of olive tree pruning transforms a struggling plant into a fruitful powerhouse.
- Seasonal Precision: The late winter/early spring timing in Step 1 is non-negotiable for Mediterranean climates, but adjust for your zone.
- Tool Technique: Step 2 emphasizes clean cuts, but here's what nobody tells you: sterilize your pruners between cuts with rubbing alcohol.
Frequently asked questions
Got questions about olive tree flower buds?
You’re not alone! Here are some of the most common queries—plus quick, actionable answers to keep your tree thriving.
When do olive tree flower buds appear?
Olive tree flower buds typically emerge in late spring to early summer (May–June in most U.S. zones). In Mediterranean climates, blooms may start as early as March–April. Buds appear as tiny, fuzzy clusters along branches—watch for them to swell before opening into white or pale pink flowers.
How long do olive flower buds take to bloom?
From bud formation to full bloom, it usually takes 2–4 weeks, depending on weather. Warm, sunny days speed up the process, while cold snaps or drought can delay flowering. Pro tip: Ensure consistent watering (but avoid overwatering) to encourage timely blooms.
Can I prune olive trees when flower buds are forming?
Yes, but lightly! Prune before buds swell (early spring) to shape the tree without stressing it. Avoid heavy cuts during bloom—focus on removing dead wood or crossing branches. Wait until after fruiting (fall/winter) for major pruning to preserve next year’s buds.
What if my olive tree isn’t getting flower buds?
Several factors could be at play: age (young trees <2 years old may not bloom), stress (over/under-watering, poor soil), or lack of sunlight. Try these fixes:
- Fertilize with phosphorus-rich fertilizer (e.g., 10-20-10) in early spring.
- Ensure 6+ hours of sunlight daily.
- Check for pests (e.g., scale insects) that may weaken the tree.
Are olive flower buds edible or useful?
While the flowers are edible (used in Mediterranean cuisine for teas or garnishes), the buds themselves are not typically consumed. However, they’re a key indicator of future fruit—healthy buds mean olives (and olive oil!) are on the way. Save the blooms for pollinators instead!
Wrapping up and next steps
Mastering the art of pruning olive tree flower buds unlocks a bountiful harvest of fruit and stunning blooms year after year! 🌿 By understanding the right timing, tools, and techniques, you’re not just shaping your tree—you’re nurturing its future.
Start small, observe your tree’s response, and soon you’ll be rewarded with vibrant flowers and delicious olives.
Ready to take the next step? Grab your pruners and schedule your first pruning session—your olive tree will thank you! For extra inspiration, explore organic fertilization tips or common pruning mistakes to avoid.